by Lester Picker, Moab Master
As a Moab Master I'm asked every so often how our studio handles paper storage... lots and lots of paper. We are constantly testing papers for ones that meet our high standards (another reason we love Moab papers!). Boxed sheet papers are obviously no problem, so long as you have room and shelves to stack them. But roll paper presents different challenges.
For years, as our fine art print business grew, we faced an increasing mess. Some of our roll papers we put back into the boxes they came in, while others we slipped into their plastic bags, and still others stood bare, ready to be used. As the variety of rolled paper types increased we sometimes got confused about which papers were which. We wasted time sorting through boxes to find the right paper and then wasted more time unboxing and re-boxing them. We also had a fair amount of damaged paper, which is a death sentence for a viable business.
We finally tackled our roll paper storage problem once and for all. I'm not suggesting that our solution will work for you, but it sure works for us.
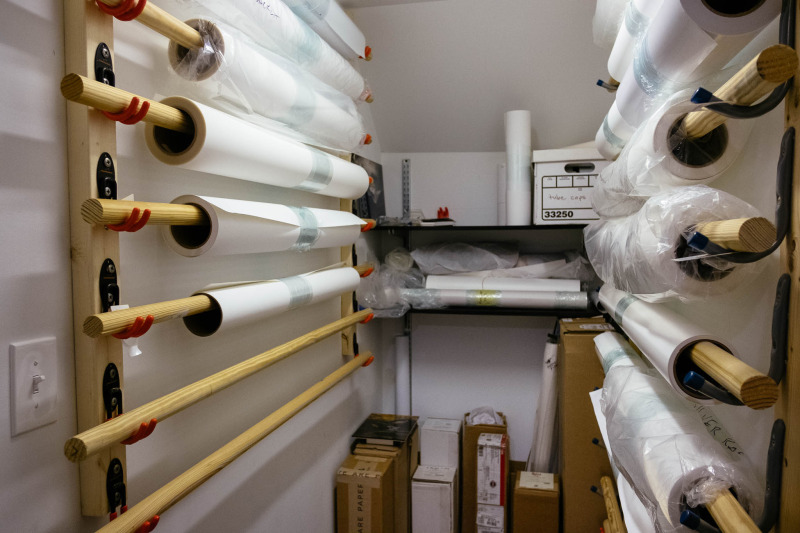
We had a narrow closet that we already used for our pathetic version of roll paper storage. When I could take it no longer, I cleared out all the papers and created the storage solution you see here.

The Solution
If this solution looks good to you, here is all you need to get the job done. The entire installation took me just a few hours from start to finish.
- Some 2 x 4s (the length will depend on how high you are willing to stretch and how low you're willing to bend to go to retrieve the heavy rolls). 2 x 4s are required because by standing out from the wall they allow enough room for the paper roll to fit between the hook and the wall.
- Screws (long enough to get through the 2 x 4, 1/2 inch sheetrock and into the stud behind)
- Toggle bolts (if you cannot screw into studs, you'll need these to anchor the 2 x 4s)
- Hooks (2 for each bar; you can get these at Home Depot; just make sure they are a sturdy kind)
- 1-1/2" diameter wood dowels (each one should be 60" long if your maximum paper width is 44", or 48" long if your maximum paper roll width is 36"). I recommend that even if the maximum paper size you can print is 24" you not go less than the 36" paper width. The maxim in fine art printing is that you can never go big enough, and that 24" printer will soon be too small for you!
- Drill
- Drill bits
- Hammer
- Level
- Tape measure
Tips
I'll let you figure out the steps needed to build this out. However, here are a few tips:
- Make sure that the interior distance between the 2 x 4s is long enough to allow the roll to fit, with an extra inch or two to prevent smashing your rolls when you mount them. In our case, the widest rolls we use are 44". However, we often use 24" rolls, so I set the distance between my 2 x 4s at 50" so I could mount two 24" rolls side-by-side.
- Allow enough room between hooks going down the 2x4 to enable you to hang the rolls without a hassle. I left 6" between the bottom of one hook and the bottom of the next.
- I found it easiest to set all your hooks going down one 2 x 4. Then simply use a long level to place each hook's partner on the other 2 x 4. This will save you lots of time in measuring. If you do not have a long enough level, you can alternately use your straightest dowel with a level on top.
- Paper rolls can be heavy and you'll be mounting and removing them every time you need one. Make sure you secure the 2 x 4s and the hooks with adequate fasteners.
- Allow plenty of room for the bars to overlap the hooks. I suggest 60" bars for hooks that are set 48-50" apart.
Hopefully, this setup will cure your paper roll blues. Good luck!

